

Okay - If you've read this far, you're probably asking, "Why are you paininting before you put trim on?
1. I hate painting trim in place.
2. If you are going to try and build one of these, you'll find out very quickly that there is a lot more surface area, not to mention trim length, than meets the eye. Everything you can do BEFORE IT'S assembled will be a time saver.
So, Actually, I should have titled this - Make your trim run to Lowe's Depot. Buy your paint from Sherwin Williams. Personally, I think Home Depot, at least locally, has a slightly better trim selection at better pricing. But both their paints suck. Buy sherwin williams or another specialty paint store paint. You won't have to paint as many coats and the overall performance of the paint will be that much better.
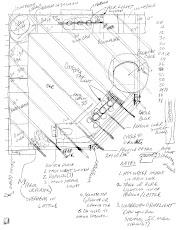
Calculate how much trim you will need. I used the following for my pergola:
1. Bottom 1/2" corner mold on the bottom of the "field" beams.
2. 1" corner mold on the face beams.
3. 3/4" stop for the base of the crown or upper beam trim.
4. 3/4" cover for the final crown detail on all the beams.
Approximate lengths of molding needed for pergola:
Bottom 3/4" corner - 110 feet
Bottom 1/2" corner - 220 feet
Top 3/4" stop - 330 feet
top 3/4" cove - 330 feet
Even if you get it for $0.75/foot, you are figuring to spend about $700 on trim alone. If you can, buy pre-primed trim.
1. Set up sawhorses to accomodate all trim pieces outside or in your garage.
2. Prime all trim pieces. I tried several ideas that included soaking a sponge in paint and pulling through to cover. However, this didn't give the desired finish.
TIP: Spraying the trim's first couple of coats may give you an excellent finish. I didn't have access to a commercial sprayer, but if you have and can spray the trim before installing, by all means, use it.
3. Apply at least one coat of gloss white or prefered color to the trim.
4. Apply a 2nd coat. (The reason I do the second coat is because I like a true coat and a thicker "Appearance."
5. If you followed my advice, you already are looking at primed plywood in the pergola. If not, prime.
6. After priming, get out the caulk. Because you are painting, caulk every seem, nail hole and wood imperfection. Some of my gaps required hitting with caulk twice or three times.
7. Paint pergola. At least two coats. Re-apply caulk as needed.
TIP: Painting is a big deal and I didn't go into a lot of steps here. But it is a time consuming process and the patience you exercise now by looking for every nook and cranny with the caulking gun in hand will give you a much better "finished" look later. Be patient, take your time.
I did NOT use a roller when painting the pergola. I used a foam brush and I didn't want the "textured" look. I really wanted a smooth or wood grain look to show through.
TIP: Find an online site to buy your paint supplies. You can get a great deal when you buy in bulk. You will need a lot of foam brushes. Try this link (I use them for boat building supplies and general supplies. Watch for their discounts)
Jamestown Distributors
www.jamestowndistributors.com
No comments:
Post a Comment