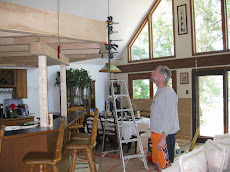
Okay, you have completed the rough in and now we need to wire this thing. What I did was:
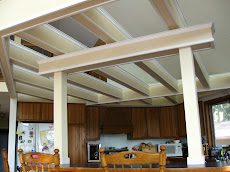
1. I added 17 halogen "puck" lights on the top of the beams. I did this for two reasons: I didn't want that much light shining down and I wanted the indirect lighting to reflect off my ceiling surface. I came up with 17 based on the layout and number of lights per beam. I ran a wire down to an existing switch where I pulled an additional circuit for the puck lighting, based on wattage and requirements.
TIP: If you are not familiar with electric loading or how to figure max electrical loads for a circuit, seek out a qualified electrician.
2. Task Lighting: I wanted task lighting at the cooktop and at the prep sink. I ran two wires here and down into my island. I plan on pulling power from the existing island lighting.
Step by Step on Wiring.
1. You will need to cut 1/4" plywood "top" skins for your beams. These are 4" wide.
2. Miter and cut to size for each beam. Place loosely on top of the beams.
3. Using a recommended size hole saw (2 1/8") mark per your layout grid and drill holes according to plan. (DO NOT FASTEN TOP PLYWOOD TO BEAM YET)
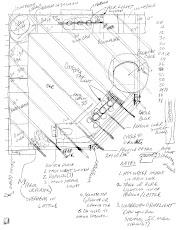
TIP: I tried to center the lights as much as possible and keep linearity with respect to the edges and face beam. This is where a really good drawing will help you with the task of orienting the lights.

4. Install the puck lights. Follow the manufacturers directions for installing. If you cut the hole precisely, you may need to keep a rasp or knife handy to open up the hole in order to get the fixture in.
5. Wire to source.
TIP: You may want to search out a lighting or electrical specialty shop and locate a "manifold" or power distribution bar. This can mount in one of the main beam races. Wire all your puck lights to this source and run main power source or 12-2 to the distribution bar.
6. Test puck lights. After successful test, go back and make sure you have secured all the wiring in the races with wire staples.

click on picture for larger image
(You can see from this picture how I tried to maintain linearity in the lighting layout).
7. Locate beams where task lights are going to be located.
8. Pull romex wire to location leaving an extra 18-24" in final location for wiring fixtures.
9. Pull remaining wire to switch.
10. I will power up the fixtures from the sitch, vs. powering at the source. This is not a major issue, but some prefer to power the source. It's up to you.
11. Once all wiring is complete, finish nail your top skins in place.
It's starting to look like a pergola.....
No comments:
Post a Comment