First things first:
Tools
You are gonna need them. I used to joke with friends that I was going to have a TV show that came on right after the New Yankee Workshop that showed how you could build the same thing Norm just built, only using a skill saw, 3/8's drill, hammer, pliers and a set of screwdrivers. However, I am a devoted convert. I am a self proclaimed tool junkie now. The right tool makes the job a whole lot easier...A list of what I think is a MINIMUM REQUIRMENT of tools you will need to tackle any remodeling project and the Pergola Project, if you are so inclined:
1. SHOP VAC. Don't even attempt a major project without one of these. Sears still makes the best
2. Skill Saw. Ripping wood or cutting dimensional to length. A must have.
3. Battery Operated Drill. Get a good one. 18 volt, preferably.
4. Drill/Screw Combination Bit - this can save a lot of time.
5. Miter Saw. A good 10" one is a must. I don't believe you need to spend the extra money on a combination miter...But if you want it, buy it.
6. Compressor/Finish Nailer Combo. This is a must for any finishing or trimming project. I find myself using this for a lot of projects around the shop. The Porter Cable pancake and 1 1/4" and 2" combination set will be the best $299 you'll ever spend.
7. Hand tools. You need an assortment: Hammer, screwdrivers, chisels, putty knives, pliers, snips, wire cutters, wire strippers, and the list can go on. But these are the minimum.
8. Levels. I personally own 3 of these: A good 48 or 72" level is a must. I have a 24" for smaller areas and then I have a reliable 6" for tight areas.
9. Squares. Speed Square, combination square and carpenter's square. All handy.
10. Coping saw, hand saw, and flat trim or japanese pull saw.
11. Hand plane or block plane
12. Hand Sander - 1/4 sheet DeWalt sander I bought in 1993 still works great. I have replaced the pad and it's still one of the best tools I own.
13. Clamps. Get lots of them. If you try any project, pick up a couple every time you're out. I have convinced my wife that owning at least 100 clamps is necessary.
14. 3/8's Drill. Never leave home without it.
15. Holes saws, drills, and assorted drill accessories.
16. RECIPROCATING Saw. Get a good one. I have had my DeWalt for 15 years.
Miscellaneous: Step Ladders, Saw horses, safety glasses, extension cords, paint brushes, paint supplies, dust covers, Tape - masking and electrical, utility knife, pencils, nail sets for finish nails.
Tools that are nice to have, but not necessary (But I used them on this project)
17. Belt Sander. There isn't any overcut too big that a belt sander can't make quick work of.
18. Hand held Power Planer. See belt Sander. When you want to reduce an area quick.
19. Radial Arm Saw. I use this for big, compound miter cuts or wider dimensional cutting.
20. Table Saw. Ripping wood to length is a whole lot easier with a table saw. Ripping the plywood with the skill saw is easy...Ripping a 3/4" board or 2" stock is easier on the table saw.
21. Jig Saw. I can find multiple uses for a good jig saw.
Tools that would have been nice that I almost bought for this project:
22. Laser Level. I ended up about 1/4" off from one side of the Pergola to the other. A bubble on the line three or four times with your 6 foot level can result in this kind of error and force you to make corrections later. If you are so inclined or already have a laser level, good buy or good for you.
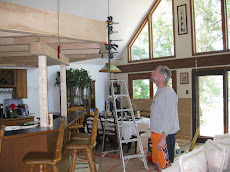
I always like to start building. It means that we have decisions and a direction. Chances are, both of those will change before any project nears completion.
For example, I was thinking about the structural issues surrounding the pergola and I wanted to keep the trim operation as simple as possible. I started to count my compound miters and angles with my current design and I quickly realized I would be mitering until Christmas if I didn't come up with some sort of time saving idea.
The idea was simple, as most good ones are. Make sure that any intersecting beams do not meet on edge.
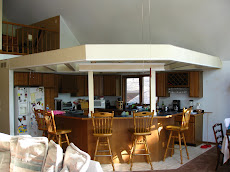
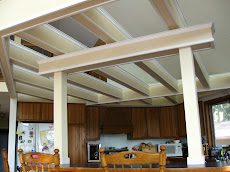
Starting at the support beam in the island, I ended up shrinking the height of this beam down and placing three spacer blocks in between the beams that rested on the support beam. You can see in the picture how it appears that the pergola "Floats" or hovers above the support beam. Simple solution.

With respect to the field beams intersecting with the outer cap beams, I made the field beams 7.5" tall by 3.5" wide. The outer cap beams were 10.75" tall. This allows for the upper and lower trim on the field beams to be cut at a square angle to the adjacent surface. Very few miters, no fancy cuts. This saved a TREMENDOUS amount of time and gives the pergola a much better look.

Here's a step by step plan for building the Pergola.
1. Go to Lowe's Depot or your local lumber supplier and get your rough lumber. Don't buy the trim yet. Take your BOM with you and see if the deliver. If not, have a pick-up ready to go.
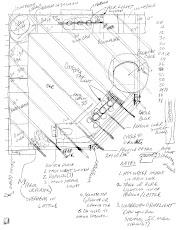
2. I started the project scribing a level line where I wanted the bottom of the support beam on the pergola to fall on the wall. This line was approximately 84" from the SUB floor. THIS WILL BE IMPORTANT LATER. I struck this line on both of the adjacent walls surrounding the kitchen.
3. Attach 2x4x8 foot studs horizontally on the line using 3.5-4" drywall screws.
TIP: If you can afford it, buy 3/4" dimensional pine and use it for your mounting surface and using spacers to "space out" from the wall to the final mounting surface. I would have saved myself some time and enery using 3/4" here instead of 2x4 stock. It costs a little more, however.
4. On the short wall, I only used one "layer" of 1 1/2" 2x4 for the mounting beam. Where the ceiling came down and intersected the wall, I need to bring the face of the mounting surface out away from the wall in order to get the height I needed, so I double layered the 2x stock, making it 3 inches thick.
5. Measure up 10 3/4" from the boards you just mounted. Strike another line on both walls. From THAT line, strike a line that is 2" below your upper line.
6. Mount additional 2x stock up to your second line. This will leave a 2" "race" for wiring that you can then add a cap to using 3/4" stock near the end of the project.
7. Rip 1/4" birch plywood lengthwise (8 foot pieces) to 10 3/4" width. Rip approximately 24 feet in length. (4 pieces)
TIP: Before doing ANYTHING with the Birch ply wood - If you are painting, put a coat of primer on all the finished sides of the plywood BEFORE YOU CUT OR MOUNT. This will save you a painting step later on and probably would have trimmed 6 to 7 hours out of the project for me. Lay them down in your garage or driveway and roll them in 10 minutes with primer.
8. Glue and Finish Nail the plywood to the mounting surface. This will be a finished surface at this point.
9. Using the 2x8x10' planks, build a header that is 3.5" wide. You will need to rip a piece of 1/2" plywood and sandwich this in between the planks.
10. Once complete, mark a vertical line 9' from the finished corner of the mounting surface outwards on the adjacent faces. This becomes the line that you will mount the "back" cross member to. See drawing.
11. Using your skill saw set at a 45 degree angle (Or your radial arm or miter) cut one end of the beam at a 45 on the vertical. Measure the distance between the 9' marks on the wall and mark and cut your beam to length accordingly, cutting the reciprocating 45 degree angle on the vertical.
TIP: Some people will think they can do the math here and use the Pythagoras Theorem and calculate the length. I always measure and cut. I have yet to find a room in a house that is PERFECTLY square.
12. Mount the header back beam to the mounting surface. Flush the BOTTOM of the Beam to the BOTTOM of the mounting wall surfaces.
TIP: BEFORE SECURING THE BACK BEAM PERMANENTLY: Check the distance of this beam at the two points from where you will be securing your columns for your support beam. These distances SHOULD BE WITHIN 1" of each other. IF NOT: Adjust your Back Support Beam or Island to get these measurements closer to each other.
13. Rip 3 more pieces of 10 3/4" Birch plywood and mount on the beam. These will become finished surfaces.
14. Build two support columns. I wanted square support columns, so I ripped a 1/2" piece of ply wood 1" wide. Rip 4 of these. I buillt my column with two of the 1/2" pieces of plywood "sandwiched" in between two straight 2x4x8's. The resulting space in the middle of the column makes an area that you can run a wire in.
TIP: This is a tight space to pull a 12-2 or 14-2 romex through. You may want "rip" out a trough in the 2x4 that is 1/2" to 3/4" deep in order to give you more space. I wish I had.
15. Cut your columns to length. This is CRITICAL. Remember the line you scribed earlier? Okay. You need to cut your column as follows:
84" - 1.5" (Beam Supporters) - 6" (Cross Beam supporter mounted to Columns 5.5" + 0.5") + 1.5" interior beam offset. See the detail drawing below for a clarification of the thought process here, but you are cutting your columns to 78" in length. This should result in a level Pergola.
16. Erect your columns in your island wall or however you are going to position them. Now, if you are going to mount them in the wall and set them on the wall base plate and not go all the way to the floor, YOU WILL NEED TO REMOVE ANOTHER 1.5" of length from your columns.
TIP: I am assuming HERE that your island wall is parallel to your back support beam that you mounted to your adjacent walls.
17. Build the support Beam. Take two 2x6x8's and cut to 72" in length. Cut two 2x4x8's to 72" in length. Build a square "box" by placing the 2x4 stock in between the 2x6 stock and fasten with 3.5" screws. Skin the box with 1/4" birch, ripped to appropriate size.
18. Once your columns are vertical and plumb and secured in place, center your support beam and mount.
19. You are now ready to begin building the internal beams. This is a process that reapeats, so I am going to give you the steps here in letters to refer back to as needed:
A. On the three main beams, you will want to use a 2x4x12 for the base of the beam for strength reasons. I will admit that this is probably overkill, but I would rather the structure be sound than suspect.
B. Start ripping 1/4" birch to 7.5" in width. You are going to need a lot. I set up a quick way to do this.
1. Get or make a GOOD straigt edge that's 8 feet long.
2. Clamp your straight edge to 4 sheets of plywood, flush and set to your skill saw's offset (usually 1.5")
3. Set the depth of your saw to 7/8" inches.
4. Rip your wood to width.
5. If this works, you will have 3 pieces ripped to width with the 4th sheet having a line started by the saw. This does a couple of things. You don't have to have someone standing ther catching your work as you go. You can complet the cut, remove and stack the pieces move the straight edge over 7.5 inches and set up for the next cut. When you have cut the first three sheets, the 4th sheet will have lines at 7.5", ready to go for the next three pieces.
6. Cut approximately 25 pieces. This should last you for quite awhile.
TIP: If you want to create a better "seam" in your plywood vs. butt jointing on the beam's length and filling later, you can create a "scarf" joint with a full sheet and a 1/2 sheet of plywood and cut 12 foot lengths instead of 8 foot. The scarf joint is a boat builder's favorite way to lengthen plywood and will be discussed in a later post.
C. Rip the 1x8x12' down to 3.5" in width. You should get two pieces from each board.
TIP: I get a lot of questions on this. Why not just buy 1x4x12 that's already ripped to size? Two reasons: 1. It's cheaper to buy the bigger, wider wood. 2. Try finding 1x4x12 stock that doesn't have a HUGE bow or curve in it. Trust me, rip your own. It will be straighter and cheaper. BETTER: If you have access to a jointer/planer and can make even straighter stock, but I think this is overkill.
D. Take the 1x4 x 12' and the 1x2 x 8' stock and build a "U" shape. This is done by gluing the 1x2 stock to the "top" of the 1x4 stock. Finish nail using the 2" nail gun up from the bottom of the 1x4 stock. Do both sides. Offset the butt seams of the 1x2 by reversing the starting end of the 12' board.
E. Start with a 2x4 and a 1x4/1x2 "U" on edge laying parallel next to each other on your saw horses or on the floor. Apply wood glue to the edges that are exposed facing up. Take one sheet of the 7.5" birch and mount to the 2x4 using the 1 1/4" nail gun and then mount to the "U" using the 1 1/4" nail gun. Finish by cutting another sheet of Birch to 4' and apply.
F. At the plywood seam, add a "butt block" of either 1x4 or 2x4 stock. glue and nail INSIDE the beam.
TIP: DON'T SKIMP ON GLUE. Glue will give this structure lots of strength. If you are using the 1/4" plywood, you will be glad you used the glue.
G. Roll the beam over and repeat step E and F. You now have one of the 3 main beams that will rest on the outer support beam. Build TWO more beams just like this unsing 2x4 stock for the bottom of the beam and 1x4 stock for the top.
SETTING THE FIRST BEAM
20. Okay. You have a support beam up. You have built 3 main beams. (I am calling these main beams as they are actuall support beams that will support the face beams that will in turn support the field beams. They are structurally important) You need to set the "middle" of the three main beams and center it on your cross support beam.
A. Strike a line at the center of the support beam.
B. Strike a line in the longitudinal center of your middle support beam where it will intersect the base support beam. This line doesn't have to run the length of the beam. A 6" line at the intersection will be fine.
C. You will need to make the support blocks for the "floating " effect. Cut 6 pieces of 1x4 inch stock: 3 pieces 3" long and 3 pieces 2.25 inches long. Square the blocks so you have 3x 3" square and 3x 2" squares. Round over the top edges using sander or block plane. Center the 2.25" block on top of the 3" block. Set these on the support beam: One at the center and the other @ 2' on center. ALTERNATE: Take 3 pieces of 2x4 stock and cut down to 1 1/2" thick 3"x3" squares. If you have a router, use a 3/4" bit and round over the top edge with a 1/4" rabbit.
D. I didn't mount my blocks to the support beam. Instead, I "surrounded" the blocks with 4x 1 1/2" screws on each side, screwed into the support beam, 1 1/4", leaving 1/4" inch exposed. This kept the block from moving, but allowed small, relative movement of the pergola.
E. This is where you might need some help. You need to find the "square" intersection line from the Main support front beam to the back support beam. Get a tape measure and your 2' carpenter's square. Have the aid hold the square on the center line on the front support beam with the squar point back to the back support beam. Have them also hold the end of the tape measure. Strike the reciprocating square line on the back beam. Exchange positions and "verify" that both lines are square to each other and their respective beams.
TIP: This step may take awhile, but it is imperative to get the center beam as square as possible. Everything else builds from this beam.
F. Mounting an "End Block" on to the Back Support beam.
1. Make an end block by cutting 2x4 stock to length. The end block should fit snuggly into the end of the main horizontal beam. Find the center of this block. DO NOT MOUNT IN THE BEAM!
2. At your center line on your back beam, draw a line that is 2" above the bottom of the beam.
3. Mount the End Block on the beam at the 2" line using 4x 3.5" screws. You will want to pre-drill the holes in the end block before mounting.
G. Get your assistant, place your ladders on the job and each of you grab an end of the beam. Raise the first main beam into position on the Front support beam. Slide the beam towards the back support beam and over the mounting block. Once the beam is over the mounting block, let go. Check this beam for level and square to the back support beam and front support beam using the 3-4-5 method. IF off more than an acceptable amount, reset the back mounting block and check for square again.
TIP: 3-4-5 Method. Measure 3' on a beam and mark. Measure 4' on the adjacent bea and mark. If the distance between the two marks is 5', you're beams are square.
You should now have your main horizontal beam set square and level. Please look at this and make sure it's what you want.
Setting Subsequent MAIN Beams

21. Once you are happy, you will need to srike center lines at 2' on either side of the main horizontal beam for the other beams locations. Use your carpenter's square to strike the lines.
22. Mount the other two main beam using the same end block mounting technique and position the beams into place. These should be 2' on center at the back beam and on the exposed ends. On the protruding ends of these three beams, insert a "block" of 2x4 glued into place and finish nailed. These will become the anchors for the Face Beam.
23. Front FACE Beam. You will need to "build" the front face beam in place. In fact, from this point in the process forward, I built half of the beam and then completed the application of the last "Skin" or face operation on the beam after it was placed. I will describe the procedure here and you can refer back to it.
A. Rip a 1/4" 8' length of birch and a 1/2" 8' length of plywood to 10 3/4".
B. Glue and nail together using 5/8" finish nails.
C. Make a top "U" as described in the earlier Beam constructionsection
D. Get a 2x4 of 8' length for the bottom section.
E. Construct "half" of the beam by attaching the top and bottom of the beam to the 1/2" and 1/4" panel. BE SURE TO ASSEMBLE WITH THE BIRCH FACING OUT.
F. Strike a 2" line on the bottom of the beam on the birch panel all the way across.
G. Get an assistant. Raise the face beam up to the 3 main horizontal beams and secure (temporarily) with screws at the correct level, centered on the main beam.
H. Create a temporary support on the wall Have your assistant hold a 1x4 x 12' at a right angle from the adjacent wall. This will become the basis for the adjacent face beam.
I. Do the same thing on the opposite wall.
J. You should now have the face beam with two temporary boards showing the intersection on the face beam. Eyeball these for relative appearance and confirm that they are square to the walls. Once you are satsified, strike the intersection line on the face beam.
K. IMPORTANT: Remove the face beam. You need to cut the face beam at a 22.5 degree angle. The adjoining beams will also be cut at a 22.5 degree angle.
L. Once it's cut, remount, permanently in position on the three main horizontal beams.
24. Adjacent Face Beams: Build two more 10 3/4" face beams (half way - completed half inboard or facing the pergola) for either side of the face beam that are the appropriate length to reach the wall and the front face beam. Remember that the intesection angle will be 22.5 degrees. Mount a beam support block on the wall beam to hold your adjacent face beams to the wall. At the face beam intersection, I cut a scrap piece of 1x4 and trimmed to fit and mounted underneath the top portion of the upper beam. This held the other end of the adjacent beam. Now, you should have the external face beams all secured, halfway built.
25. You need to strike the opposing 2' center lines on the face beams. Use your carpenter's square or other technique.
TIP: Another way to do this is to take two pieces of 8' 1x4 and clamp another 8' piece square to the ends of the two boards. Strike a two foot line and place on top of the three beams you already have in place. Clamp in place. You now have a temporary "guide" that will show you the intersection on the face beams and back beam or wall in order to take measurements more accurately. This was a time saver for me personally. If you have a better system, by all means, use it.

26. Start filling in the remaining "field" beams that are constructed exactly like the face beams, only you use 7.5" 1/4" birch plywood only. Contstruct so that the most external, or short face is constructed on the half beam, leaving the long face left to attach after the beam is oriented and secured.
TIP: If you made the jig I suggested earlier, you can temporarily clamp the beam to the jig to hold it close to where it will be mounted. It will be much easier to do a final positioning and securing to face beam.
27. Fill in the Back Beam - Wall Triangle. Technique here is exactly the same. If you have made it this far, building beams is EASY....You are cruising now.
A. Strike a starting line on the back of the back support beam that is EXACTLY half way between the horizontal beams on the opposite side. I personally think this looks the best.
B. Repeat the squaring process and strike lines on the walls. These will intersect at a 45 degree angle. Carpenter's square is handy here.
C. Build the half beams and install. The space starts to get tight, but you should be able to manage.
D. Skin the opposite sides of the beams to close them up.
TIP: Skinning the long side of the beam. Cut your plywood at a 45 degree angle for the pieces that will intersect at that angle. Position and cut to length. Apply glue to the plywood and get an assistant and some clamps. I found that clamping in place and then making adjsustments before nailing was easier than trying to nail and making adjustments.
28. Filling in the face Beams: Make face beam sides the required length out of the 1/4" and 1/2" sandwhich. The 1/2" plywood may not be necessary on the outer face of the face beam, but I used it here, so if you want to follow to print, use. Glue, clamp and finish nail in place.
Your pergola should now look something like this: