Still working on the Bathroom remodel, but I thought I would give you an update on the Kitchen and some little things that have "popped" up that some foresight might have helped with.
The Island Countertop: It's not a big deal, but the granite on the upper island countertop has separated and the epoxy filler used to close the gaps has opened up and left "cracks" that you can put a thin sheet of paper in. I saw one of my daughters doing this which brought it to my attention. I called the granite guys and they came back out and re-epoxied, free of charge, citing that expansion and contraction will sometimes cause this to happen. I am waiting to see if the fix stays or if I need to locate something that is more flexible for the island. If I had suspected there would be relative island movement (?) if that's what's causing the seperation, I could have "fused" the walls together with some metal strapping or something to help reduce this. I had never seen or heard of an issue like this. I also suspect it has something to do with the fact that my granite wasn't "attached" at the joint with anything but the epoxy. While that's industry practice, I think some sort of underneath support may have helped reduce this problem, also.
Counter Back Splash on Exterior Wall: I have one run of the counter that is on an exterior wall. At all my "transition" joints, I used a flexible caulk/grout that was sanded and matched the grout perfectly. I have used this product everywhere I have grouted in past projects and you have two adjoining planes (wall to wall, wall to floor, Etc.) and it has worked great every time. Unfortunately, a crack has opened up between the back splash and my counter top. I hate to simply caulk this joint as I think caulk alone looks really bad. However, I must have a lot of relative wall expansion/contraction in the winter months as the crack is about 1/16" of an inch. I am probably going to re-fill with the flexible grout and see how it lasts through another cycle before addressing seriously.
Lighting: I finally added a task light over the cook top. Easy purchase and we finally stopped looking and just bought one and installed. However, that made the issue apparent of the...
Cooktop: We couldn't possibly have known this prior to purchasing, but the GE Profile Gas Cook Top is extremely difficult to clean and care for. And being black gloss finish, it shows EVERYTHING. Had I thought this through, I may have opted for a stainless steel or matte finish that wouldn't show the streaks/dirt/grease etc. from every meal. I find myself removing the grills and cleaning the underneath surface pretty much after every session or meal. If you don't, it simply looks gross. So, when looking for cooktops, a matte finish with easy clean solutions should be a priority.
I still don't like having the trash - recylcing in the lower cabinets and my kids have proven me correct in the assumption that "not all the trash always makes the bag". However, I have had them clean the cabinet interior a couple of times now and the cleanliness is getting better. So, maybe it's really more of a control issue when disposing of waste.
Other than that, everything seems to be holding up well and the usefulness of the design is exceptional. I find that two, and sometimes three people can easily work in the kitchen and not get slowed down from either not having enough space or running into each other. And it works equally well when you're cooking by yourself.
My favorite feature, without question, is the prep sink - water near the cook top area. I use the prep sink for just about everything - cleaning vegetables, draining pasta, etc. and it's truly an add that's worth it if you can find it in your budget and can afford giving up a little cabinet space. However, we put all the cookie sheets, cutting boards and cooling racks in this space and it seems to work perfect for that, so we didn't really lose much at all, even though there is a disposal in this area, also. I tell my wife she needs to thank her general contractor-plumber for the tight installations on the plumbing under the sinks.
If anything else comes up, I will post.
Monday, February 8, 2010
Thursday, November 5, 2009
The Ideas Are Getting Bigger
After an evening of taking stock and trying to figure out EXACTLY what we wanted, Eann and I were able to determine the following facts:
1. Two sinks in the bathroom should be an ESSENTIAL.
2. No one had taken a bath in that particular bathroom for the better part of 3 years.
1. Two sinks in the bathroom should be an ESSENTIAL.
2. No one had taken a bath in that particular bathroom for the better part of 3 years.
3. We had another bathroom in the house that had a tub and our master bath also had a tub.
4. Was a tub necessary with two girls that were now showering?
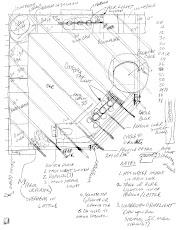
Upon further review, the room wasn't as big as I thought it was. The overall width is only 71" and the overall length was about 92" with the step wall where the bath faucet plumbing is contained at 36" by about 12". Here's a quick floor plan:

Building the Budget
Neo Shower - Kits or Do it Yourself?
So, it was decided to look at designs that included a neo shower in one corner of the room in addition to a double vanity - sink combination. Based on that, the options are somewhat limited, but we could certainly put in a neo-shower kit as shown below:

Price: $2,033
PRODUCT FEATURES
American Bath Factory Custom Shower Kit
System Includes Shower Walls, Frameless Glass, Door, Pan with Built-In Drain, Designer Faucet with Hand Shower, and Hardware.
Neo Angle Showers are not completely frameless; Features header along the top edge.
Showers come in Medium Sistine Stone with Dark Accents; Stone coloration may vary slightly.
Neo Cut will be in the Center; Faucet and Accent Panel will be on the Right Wall (P21-2017) or Left Wall (P21-2018).
Features Center Drain
Optional Accessories:
Body Sprays
Shampoo Shelf.
Faucet and Accessories are not pre-installed on shower panels.
Freight Shipping Included within the Continental U.S.
Click here for warranty details
SPECIFICATIONS
Width: 36"
Length: 36"
Height: 86"
Glass Thickness: 3/8"
This is a 36" by 36" design that would fit into the current configuration of where the tub is and the toilet would fit adjacent to that and still allow plenty of clearance for easy ingress and egress to the shower. A kit like is relatively attractive, but does not necessarily match the tile you may choose to go with the overall room. The other option is to either
a. Build your own pan with a liner and curbs that are custom to your space (I don't "NEED" to do this, but depending on what tile is selected, it may become necessary.
b. Buy an acrylic pan and build your neo-shower doors and install the tile and hardwared according to your tastes and design specifications.
By the time you add glass, faucets, and other plumbing, it's more or less going to be a wash on cost. So figure $2,000 for the shower enclosure with all the hardware.
Yet another thought (by me - but I am SURE would get a lot of support) based on whether or not the budget would allow it, but I am sure it would get used by two girls that get colds and want to "take a steam" would be a shower-steamer option sold as a single unit assembly:


This is an integrated unit with a multiple shower heads, a seat and steamer all built right into the unit. However, at $2,500, it's approaching what I had budgeted on the low side for the remodel - not that I believed I could actually do this bathroom for $3,000. But I had envisioned getting out for under $4,000, fully knowing that any upgrades would probably exceed that number. With this type of addition, you would need to extend that up into the $5,000 range.
Sheesh....What am I getting myself into?
Final Shower Budget - $2,000 to $2,500. CHEAP - $1,500.
Vanity, Counter, Sink and Faucet Budget
I can probably do this one from memory, but for some images and ball park figures, I have attached the following and made links to supporting websites in order to browse the selections for other options:

Faucets from Classic Faucets.com for $169

So, figure in another $2,000 to $2,200 for the vanity-sink-counter-faucet combo.
Tile:
This one feature can vary per your tastes and usage. But, assuming we do some wall work, which I am sure we will, we are probably looking at 200-250 square feet at around $3-$4 a square foot, installed. So, doing the math we have about $800 - $1,000 for tile.
Lighting: $200 and No More
Toilet: Can you spend more than $200 on a toilet? Really? I don't think so....
When you add it all up:
Shower: Low: $1,500 High: $2,500
Vanity-Counter-Sink- Faucets: Low: $2,000 High $2,500
Tile: Low $800 High: $1,000
Toilet: $200
Lighting: $200
Grand Total: $4,700 to $5,900, give or take.....
Sigh...
Tuesday, November 3, 2009
On to the Bathroom...Step 1 - Ideas
My wife wants to do the one last room in our house that hasn't been "officially" touched by me, even though I have put a new toilet seat on the pot. Sheesh...
Briefly: We have a main floor full bath that's about 7' by about 9.5' when you include the 60" tub and shower, or about 7' by 7' of floor area with a toilet and 30" vanity. I will post before pictures to give you an idea of what we are starting with. Very old decor with thin ligh blue ceramic tile and thin (unsanded) grout lines that cover the floor and shower enlcosure on the walls and soffitted ceiling over the bath. There's and almond tub and an old oak vanity.
Briefly: We have a main floor full bath that's about 7' by about 9.5' when you include the 60" tub and shower, or about 7' by 7' of floor area with a toilet and 30" vanity. I will post before pictures to give you an idea of what we are starting with. Very old decor with thin ligh blue ceramic tile and thin (unsanded) grout lines that cover the floor and shower enlcosure on the walls and soffitted ceiling over the bath. There's and almond tub and an old oak vanity.
Anyway, in thinking of some new designs and I was looking at pictures on the internet for inspiration. I have included them here so they get me to thinking about what I want. I think, but I am not 100% sure, that I want the wall that you face to be tiled, or at least textured. That would break up the room and give us a chance to express our style in a different way. Right now, everything is slick finish white walls. I was also thinking of something on the ceiling - a wood or possibly bamboo look that would also add some character.
Some of the pictures I have seen that I like and will comment on below the design:
 I like the look of the walls and floor here and the tasteful use of chrome. While I am not a big chrome fan, when done correctly, I think it adds a lot of style and character. Problem is, you need to clean it all the time for it to look good. With two pre-teen girls, not a good idea unless you plan on cleaning it all the time. You can have the blue mirror...Don't know what they were thinking there.
 I really liked this vanity as it gave the room an exotic look and the use of the wood was somewhat rustic and the room says "water house" to me somehow. The texture walls look like a brushed concrete tile that you can glue on and then grout. I love that it's textured and not shiny. Shiny tile is too much in a small bathroom. I think you want the natural matte surface or stone for a smaller room. I was not thrilled with the sink selection, but I understand that they needed to do something different here. I may have continued looking around instead of going with that design.
I really like the wall with the mirror detail here. In a small bathroom, it might be too busy and I need to play with some graph paper and lay the wall-tile - mirror combo out and "see" how it would look. I also really like the built in tiled vanity and countertop. It ties everything together and doesn't look like you just "mounted a vanity" in the corner of the room and threw a sink in it.

I liked the rustic look of the slate on this wall. It also said "water house" to me and it's not shiny nor would it show spots. A little dark for a smaller room, but big, irregular sandstone (light tones) might work.


Uhhhhh...Hmmmmm. Yeah, I am not sure my wife would allow this. Even though I can appreciate what went into it.
Looking at details, we wanted some additional shelves in the room, and there is a step corner where the toilet sits that gives us a location to mount either shelves over the toilet or possibly corner shelves. If we don't do the tile, we could go with something like wood:


Or, you could stay with the simple elegance of glass or stone:


Glass and stone will be much easier to clean and keep "neat". Of course, that assumes that two girls can keep a bathroom "neat" looking. So, we may have to scrap the whole open shelves idea and go with a closed cabinet.
My biggest issue with a closed cabinet is that you are now limited with what you can do with respect to wall textures and designs. You are pretty much committing to a vanity wall cabinet combo that matches. And while that doesn't bother me, it will not be an expression of artistic ability.
So, what to do?
Decisions, decisions.
With respect to the ceiling, wood always looks different and adds warmth to any room. Concern is in a bathroom, will it discolor or otherwise become somethign that I need to address in the next 20 years? But you can't deny the look:

A nice redwood would be easy and fairly water resistant. And redwood is easy to work with and probably would be low maintenance.
 Bamboo, on the other hand, would probably require zero maintennace, but it might not be as elegant or maybe a little to "Florida-ish" for a Michigan home.....but you can buy the bamboo strips relatively cheaply and they are simple to install.
Wednesday, October 14, 2009


Friday, August 8, 2008
Final Photos
Here are some final photos of the Pergola. When the Kitchen remodeld starts with new cabinets, floors, and countertops, I will add more photos.
(Click on any photo in the blog for a larger image)


Sunsets are great in our house and the Pergola looks good in the afternoon light.

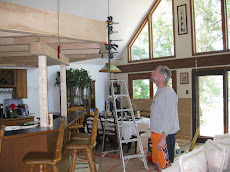
This is a good shot from the corner of the kitchen looking out into the rest of the room. You get a sense for how big a space this is and why we needed the overhead structure so you didn't get the feeling of being dwarfed in the room.

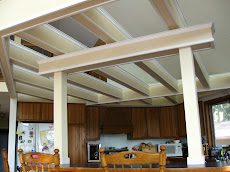
This photo shows the detail of how I supported the beams and didn't have to worry about trimming or mitering the intersections. Of course, cleaning and dusting will be somewhat tedious.....

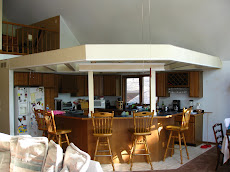
This final shot shows the front island panel painted. Eann and I were trying to decide whether or not to have a painted view from the living room or cabinet panels....she is leaning toward cabinet panels at this point.
Nightime.....Is the right time...

Another Night Shot....

Two happy kids and a kitchen remodel...

.....
(Click on any photo in the blog for a larger image)


Sunsets are great in our house and the Pergola looks good in the afternoon light.

This is a good shot from the corner of the kitchen looking out into the rest of the room. You get a sense for how big a space this is and why we needed the overhead structure so you didn't get the feeling of being dwarfed in the room.

This photo shows the detail of how I supported the beams and didn't have to worry about trimming or mitering the intersections. Of course, cleaning and dusting will be somewhat tedious.....

This final shot shows the front island panel painted. Eann and I were trying to decide whether or not to have a painted view from the living room or cabinet panels....she is leaning toward cabinet panels at this point.
Nightime.....Is the right time...

Another Night Shot....

Two happy kids and a kitchen remodel...

.....
Wednesday, July 30, 2008
Final Tips and Thoughts
TIP #1: Carefully look at your pergola with a critical eye. I like to call this my own Project Punch List. Before the tools get put away for the last time on the project, is there anything else that needs attention? Do it now. I see so many projects that are 95% of the way complete and someone doesn’t have the final piece of trim in place or final bit of paint touched up. You don’t want to be that person. Dedicate an evening or a day and complete it. You will be much happier in life
TIP #2: Make sure you have a long enough vacuum cleaner attachment to “vacuum” the tops of the beams of your pergola. I would recommend doing this at least once a month in order to keep the dust level to a minimum. The attachment arm should have a soft brush attachment so as not to scratch the surface or the lights of the pergola. Spiders may make the pergola their home as well and you will want to vacuum in order to keep them down to a minimum
TIP #3: After any project, at least any project I do, some self doubt creeps in and I am frustrated that maybe it isn’t good enough. I could have done better. Walk away from the project and scrutinize it again in 2 or 3 months. I was having some doubts about my basement finishing project near the end and I had wished I had done several things differently. I don’t know what to call these feelings of capitulation – project regret? But I find that if I let the feelings go and come back later and look at something, I see that my attention to detail and the extra time has paid off.
I enjoy working on projects like this. I feel a strong sense of accomplishment at the end of the project and it always makes me feel better to have completed something like this myself vs. having paid for it. For me personally, there is a satisfaction in the knowledge that I could have paid someone big money for lesser results and I know that I achieved results that you probably can’t pay for, or would be difficult to get even if you were willing to pay for it.
Things I wish I had done different:
1. Pre-paint the plywood. It would have saved a lot of time.
2. Scarf the plywood. I think this would have made more uniform seams. Minor, but maybe worth the extra effort.
3. Crown trim. I should have used a sleeper piece of ¾” by ¼” piece of stock on top of the stop and behind the cove to control how much reveal I had on the stop and it would have given the top of the pergola a cleaner look. This is probably my biggest regret. I thought I could save a couple of bucks and caulk behind the cove. Between the time caulking and the amount of caulk, it may have been a wash and the results would have been better.
4. Incorporated some sort of “design” or “artful” elements into the design. I am very good at seeing things from a fundamental basis. However, I have had some people comment on some artsy things I could have done with the painting or adding design and trim elements that would have set the pergola off. The paint elements we may still be able to incorporate before we install the cabinets, and I am playing with a couple of things. But this would have been easier before the trim went on. Plan, plan, plan and don’t be afraid to share your ideas with others.
Ideas that have come along since we’ve completed the Pergola:
A textured roller or “rag roll” look on the beams would have added a lot of depth and character to the pergola. I am experimenting with this now. I have never done anything like it and there are countless internet sites that go into this in great detail. I would reference those for the how to. At the bare minimum, I will probably do something with my columns to give them a “marbled” look without the marble – but I have lots of time before I need to have that complete as we are 4-6 weeks away from cabinets and granite counters.
Another idea was to incorporate a plant staging area somehow. I haven’t completely thought this element out, but a friend with a green thumb made a couple of very logical suggestions that would have been sort of easy to incorporate – a closed in shelf in the corners, for example – where you can have a plant growing in a pot, off the counter out of site. Then, the plant could grow throughout the pergola, which was our vision initially. We will probably end up using the tops of our cabinets for this staging area. But adding something to the design or at least think through would have been fun.
Monday, July 28, 2008
Trimming and Final Paint


Okay. Now it's time to trim.
Hopefully, if you have come this far, this isn't your first trimming project. If it is, well, be patient. I am going to start this section with tips vs. a step by step process of how to trim.
TIP #1. You can cut it too long every time. You can only cut it short once. Fudge to the big side and re-trim after test fitting.
TIP #2. Use finish nails sparingly, but don't go so light with them that trim can "separate" from work. You will have to fill ever nail hole and if you have already filled the plywood, you know how much fun THAT is...So, secure it and stop.
TIP #3. When doing the crown trim stops, and you have it cut to the perfect length, cut the associated Cove trim that butts up to the stop. You will save yourself a trim trip due to the fact that you can cut precisely what you need.
TIP #4. If you do cut it too short, all is not lost. If there isn't another spot you can use the piece, or it was getting very specific, install it. Caulk the open spot. The naked eye won't see your "faux pas" from 3 feet. Believe me, it will still look great.
TIP #5. When you are cutting the 67.5 degree cuts for the interior triangles pieces that need to mitered, build a jig for miter saw. This will save some time and allow you to make precise cuts quicker and more accurately.
TIP #6. I didn't have a lot of coping saw cuts to make (In fact, I didn't have any - all my cuts were opposing angles) but if you do, remember to cut the angle and cope the un-needed portion away by following the cut line.
TIP #7. Patience. Take your time. This is where the effort really starts to pay off. If you can make this look good, everyone will notice....
TIP #8. Trim done? Start caulking and filling all those finish nail holes. There are multiple types of caulk sticks on the market that will make this job easier. I use the gun with the smallest hole I can make on the tip. Then, I use a finger and paper towel to smooth and get rid of the excess.
TIP #9. Start final painting - TRIM FIRST. Why? The trim will be easier to wipe off the base color due to it's gloss finish. Also, it you are painting a darker bae color, any white you get on the base will cover in one coat.
TIP #10. TAKE YOUR TIME. It's getting near the end now.....
Subscribe to:
Posts (Atom)