I sometimes think, and Eann ESPECIALLY thinks, that I get a little too ivolved in planning. I guess I spend a lot of time lost in thought when I am getting ready to start a big project. But just when I think I'm overthinking, something pops up that re-inforces the idea of a well planned out project. Use whatever planning tools you have at your disposal and don't be afraid to WRITE DOWN THE DETAILS!
It might be something really minor - white caulk for finish trim - but when the thought hits you, write it down. I can't tell you how invaluable notes and writing down the most minor of details can become once you are into a project. Sometimes, it's those thoughts that you have already gone through that end up saving the day or showing you the way through the next change or new idea.
Case in point:
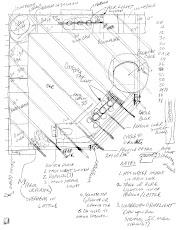
Initially, the Pergola was going to be a solid wood structure. I was going to use Cedar for weight reasons and the plan was to either use three 2" x 8" planks cut to length laminated together to form a single beam that would have been 4.5" x 7.5" finished size. That would give me the height and width of the beam that I wanted and also let me cut in the design on the exposed, overhanging ends. I also thought I could get away with "splitting" the center lamination in order to create a "runner" space for the rope light in addition to reducing the weight. However, Eann didn't like this idea at all. She was starting to think we would have too many "wood" elements colliding with cabinets, flooring, and the pergola all being different wood. I agreed with her. So, I scrapped the laminated beam idea.

(click on the image to enlarge)
The next idea was to get plywood that matched the cabinet material with matching stain and finish. Then, the Pergola would match the cabinets. I initially considered dimensional lumber for this solution, but that quickly proved to be cost prohibitive. We could afford plywood that matched the cabinets and matching trim, albeit this was going to get expensive, also. And I was starting to have some doubts about the rope lighting.
But, I was stuck on rope lighting for the top of the Pergola. Don't ask me why. I wanted rope lighting and for whatever reason I had concluded that it was the only way to create the indirect lighting affect we wanted for the kitchen. I guess it came from a lot of cabinet indirect overhead lighting ideas that I have seen where rope lighting is placed behind the finish crown molding for the "spillover" light effect. I assumed I would use rope lighting on the cabinets and I just couldn't shake it.
Finally, my moment of clarity came when I realized I was going to have a hollow beam that would be capable of housing anything. I realized I could put a conventional lighting can in the beam or use halogen puck lights. I quickly scrapped the rope light idea and the drawing changed again:

(click on the image to enlarge)
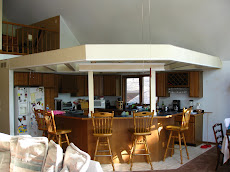
This idea was now a simple design with a painted finish, vs. trying to match the wood with the cabinets and having it clash with everything else that would have a bright, or polyurethaned wood grain finish. We decided to match the colors we painted the room, cream on the walls with high gloss white trim.
It all clicked at that point. That was it.
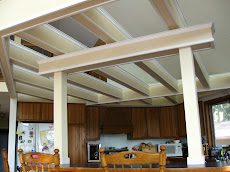
Don't be afraid to change and write details down. The Close to Final Beam for the Pergola Design:

(click on the image to enlarge)
Once we decided against the laminate and that we were going to paint, the design simplified down to a single sheet of 1/4" Birch plywood for each of the beam sides. If you are questioning the "strength" of a boxed beam using 1/4" plywood, consider: Structure only needs to support itself. The sides of the beam are really only holding the tension beam (bottom) and compression beam (top) in position to support themselves.
If you still have questions about this - please go to
Engineeredlumber.com
Georgia Pacific gives a nice summary of engineered lumber and the principles behind it. Better yet, if you doubt the strength, build a test beam and test to failure. I think you will be very impressed with how much weight you can actually hold.
Details, Details, Details
Here is our kitchen budget. I love Excel and use if for just about everything - Buegeting, Timing, and idea tracking.
Budgeting a project like this is difficult. There are lots of guides on the internet. But, I have some stuff that you should try to budget in and think about, in no particular order:
1. I always add 10% to any costs I find at Lowe's Depot or on line
2. Budget the nicer materials. You can always come down later. This gives you a worst case scenario
3. Cabinets ARE EXPENSIVE. That's all there is to it. I went into sticker shock pricing our kitchen out. But, you will have them for the next 20 years, so go with the best you can afford.
4. Granite vs. Composite countertops is becoming a cheaper alternative. And I think granite looks better. Granite tile is an even cheaper option and probably will run you about the same as a formica countertop. Price it out.
5. Floor heat: Wire mesh that you place under the tile for those cold mornings. It's cheap when compared to the overall cost of the kitchen and easy to install.
6. Add a prep sink, if you have room. I think a prep sink -faucet near the cooking area is a huge added value. Try to manage it into the plan.
7. Quiet DISHWASHER! Pay extra for the lower decibels...
8. Careful choosing Stainless Steel Appliances....Hard to keep clean and magnets don't work..
9. Consider a double wall oven for re-sale if you are going with separate cooktop...
9.a. ...and a warming drawer. It will get used on Thanksgiving, I'm told...
10. Wall cabinets with glass doors add some pop and style at a low cost - especially if you add light INSIDE the cabinet. But you need to keep contents neat and orderly.
11. If your kitchen is like our kitchen, think about a media center. That's a nice term for a mail - homework - bill and general crap collection area. If you go this route, think roll top desk for when unexpected visitors pop in. It's a quick way to clean up (or hide) a mess....
12. Recycle center - but most good cabinet places will remind you of this.
13. Need vs. Want - Eann thinks she NEEDS more cabinet space...I believe she WANTS more than she could ever actually use. More cabinets means more things you will get to fill them up. Consider what you need and what could be stored somewhere else: Hall Closet, attic, etc...If it's only used once a year - or sometimes not even that often.
14. Gas wherever possible. It's my belief that this will eventually be cheaper than electric. Not to mention I like cooking with it better.
15. Pay extra for the convection oven...It cooks faster and will save energy.
16. There's more and will be more...but that's a start.

(click on the image to enlarge)
TIMING, TIMING, TIMING!
This is everything, and frankly, I am not very good at it. If I write a time down that something will be completed, I can usually, with a great deal of confidence, tell you that's the date that it WON'T be complete. It might be before, it might be after, but that date isn't it.
I don't know if this is good or bad. Obviously, if you're way of life is impaired due to the remodel, being late to your timing plan is not only unacceptable, it sucks. However, if your project isn't hindering normal life, timing can take a back seat, somewhat. Eann will completely disagree with this statement, but I think it's better to take your time, do it right, and get the best results you can. Rushing anything will show.
Here is my timing plan for the kitchen remodel (note that I don't have dates associated with cabinets yet. The ordering process is still in progress. Once I have an idea when they come in, I will be able to complete):

Planning Tips:
1. Create a detailed material list. The fewer runs to Lowe's Depot you make, the more time you save, not to mention gas.
2. Save the Lowe's Depot Savings or discount cards. Make multiple purchases to take advantage of all the cards they send.
3. Have a note pad on the kitchen table or counter that is DEDICATED TO THE PROJECT. When an idea pops in your head, write it down, no matter how insignificant.
4. Consider all aspects and personal impacts the project will have. Think about the kids and try to budget time for them.
5. You talked about the ideas, make sure you talk out the planning stage as well. There is no detail that's too minor not to throw out there and get a reaction on. It's better to discuss now than to have to face the "capitulation" that will surely take place in the next phase.
6. If you are building something, plan the build in your mind. This will help you to visualize challenges you will face when you actually get to them.
7. Buy extra. I always grab 5 or 6 extra studs and an extra sheet of plywood for "Oh Shits..." IT's a good idea....
No comments:
Post a Comment